2부에서, 당신은 매우 간단한 웹 페이지를 만들기 위해, WebMatrix의 사용법과 이 페이지가 다양한 브라우저에서 어떻게 돌아가는지(연동되는지)에 대해 살펴 보았습니다. 이 섹션에서 당신은 종속형 시트(CSS)라고 불리는 기술을 사용하여 페이지의 시각적 스타일을 바꾸는 방법에 대해 알아볼 수 있습니다.
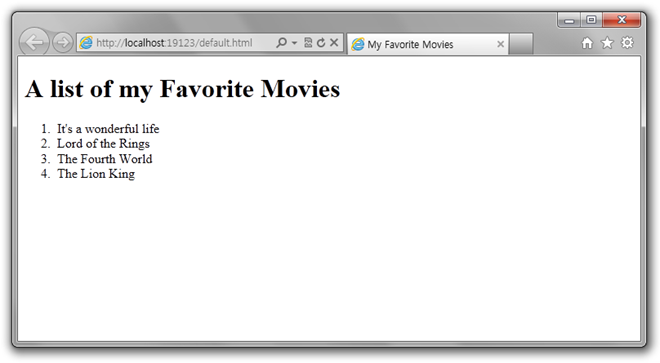
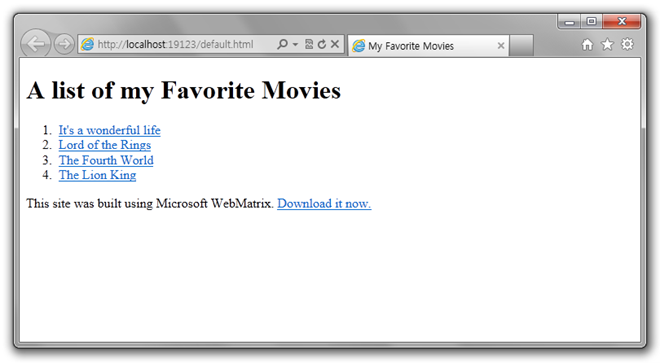
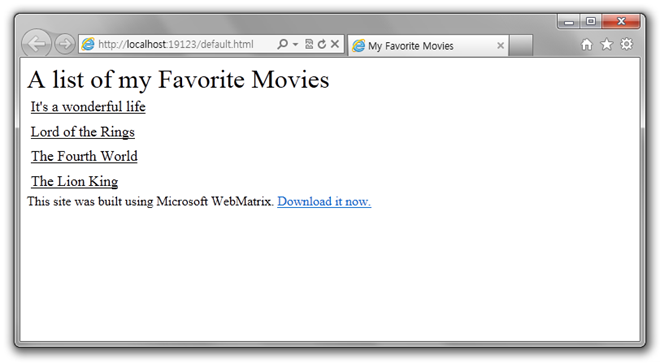
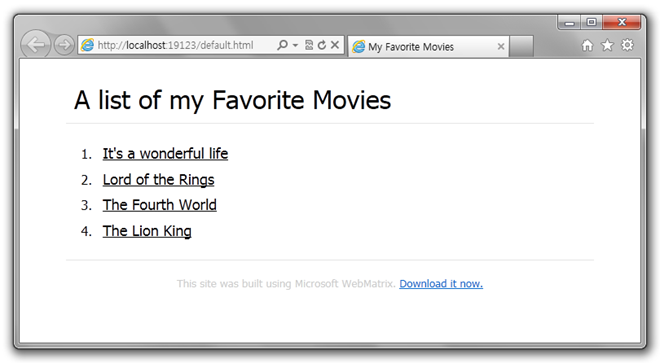
여기 당신이 만든 간단한 영화 목록 웹 페이지가 있습니다:
CSS 스타일 시트를 사용하여 스타일링을 위한 페이지 준비하기
다음 몇 개의 단계에서 하이퍼링크, 페이지 분할 및 스크립트 태그와 같은 기능의 몇몇 HTML 태그를 볼 수 있을 뿐 아니라, 룩 앤 필(Look and Feel)을 설정할 수 있도록, CSS 스타일 시트를 이용해 페이지를 수정하는 방법을 볼 수 있습니다.
웹사이트에 있는 페이지와 또 다른 페이지들 사이에 공통적인 레이아웃을 사용함으로써 공통적인 콘텐츠를 더 쉽게 편집하는 방법을 볼 수 있습니다.
분할자(div 태그) 사용하기
HTML에서, <div> 태그를 사용하여 페이지를 논리적으로 나눌 수 있습니다. 이것은 문서의 뒤에서 스타일을 살펴보기 시작할 때 특히 유용합니다. div 태그가 포함되는 부분에 스타일을 지정하면 특정 부분에 스타일을 입힐 수 있기 때문입니다.
그래서 이제 시작해 보면, 여기에 페이지의 일부분인 HTML이 있습니다.
<!DOCTYPE html>
<html lang="en">
<head>
<meta charset="utf-8" />
<title>My Favorite Movies</title>
</head>
<body>
<h1>A list of my Favorite Movies</h1>
<ol>
<li>It’s a wonderful life</li>
<li>Lord of the Rings</li>
<li>The Fourth World</li>
<li>The Lion King</li>
</ol>
</body>
</html>
해야 할 첫 번째 일은, 영화를 포함하는 목록을 아래와 같이 <div>로 감싸주는 것입니다:
<!DOCTYPE html>
<html lang="en">
<head>
<meta charset="utf-8" />
<title>My Favorite Movies</title>
</head>
<body>
<h1>A list of my Favorite Movies</h1>
<div id="movieslist">
<ul>
<li>It’s a wonderful life</li>
<li>Lord of the Rings</li>
<li>The Fourth World</li>
<li>The Lion King</li>
</ul>
</div>
</body>
</html>
이제 영화를 포함하는 <ol> <li> 다음 목록이 현재 <div> 태그 내에 포함된 것을 볼 수 있습니다. 이제 페이지를 열어 보면, 이전과 아무 차이가 없는 것을 볼 수 있습니다. 이것은 <div> 태그가 논리적 구분자이기 때문입니다. 그것은 어떤 물리적인 외관이 없습니다.
하이퍼링크 사용하기
당신은 아마 이미 하이퍼링크가 친숙할 것입니다 – 다른 페이지로 연결을 하기 위한 클릭 가능한 영역입니다. HTML에서 하이퍼링크라는 용어가 있지만, 그것들은 원래 <a> 태그를 사용하여 하나를 만들 때마다 쓰는, 앵커라고 불렸습니다.
<a>에서 (또는 앵커) 태그는 <a>에서와 </a>사이에 클릭 가능한 콘텐츠를 만들어 작동합니다. 이 콘텐츠에 사용자가 클릭하면, 브라우저는 href가 (하이퍼 – 참조)로 <a> 태그에 href attribute 로 표시하면서 리디렉션됩니다
attribute 는 태그 안에서 정의하며, 이와 같이 태그 스스로 정의됩니다:
<tag attribute=”attributevalue”>content</tag>
따라서, 이 같은 구문을 사용하여 하이퍼링크를 만들려면:
<a href=”http://www.microsoft.com”>Click Here</a>
href는 위와 같은 웹 사이트를 포함하지 않아도 되고, 프로그래머가 사용하는 자바 스크립트 함수 구현 같은 작업이 필요하지 않습니다.
There’s a special href that can be used as a placeholder, while you’re developing, so that you can test that the styling of hyperlinking is working. To do this, use the “#” character as your href.
여기 당신이 개발하고 있는 동안, 당신이 하이퍼링크의 스타일링이 작동하는지 테스트할 수 있도록, 자리 표시 자로 사용할 수 있는 특별한 href가 있습니다.
이렇게 하기 위해서, 당신의 href가로 "#"문자를 사용합니다.
So, to turn all our <li> items containing our movies into hyperlinks, we simply wrap the text of the movie in an <a> tag, and set the HREF to #, like this:
우리의 영화를 포함하는 모든 <li> 항목을 하이퍼링크로 바꾸기 위해서, 우리는 <a> 태그를 사용한 영화의 text를 이와 같이 herf를 #으로 설정해서 간단히 감싸 줍니다:
<!DOCTYPE html>
<html lang="en">
<head>
<meta charset="utf-8" />
<title>My Favorite Movies</title>
</head>
<body>
<h1>A list of my Favorite Movies</h1>
<div id="movieslist">
<ol>
<li><a href="#">It’s a wonderful life</a></li>
<li><a href="#">Lord of the Rings</a></li>
<li><a href="#">The Fourth World</a></li>
<li><a href="#">The Lion King</a></li>
</ol>
</div>
</html>
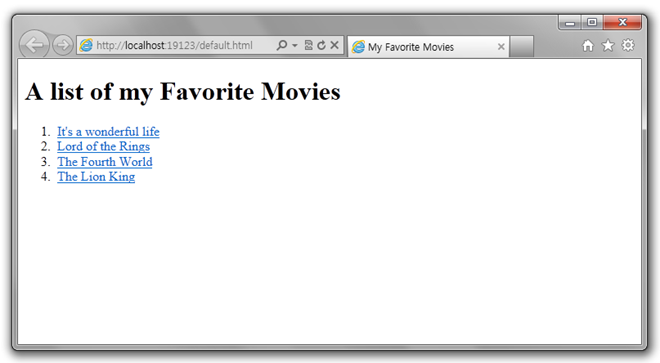
If you run the page, you’ll see that the elements on your list will use the familiar style for hyperlinks, namely a blue underline:
당신이 페이지를 실행하는 경우, 귀하의 목록에 있는 요소가 친숙한 하이퍼링크 스타일로 즉, 파란색 밑줄을 사용하는 것을 볼 수 있습니다.
머리글 및 바닥글 추가하기
The next thing you’re going to do is to add a Header and a Footer to the page.
다음에 할 일은 그 페이지에 머리글과 바닥글을 추가하는 것입니다
You’re going to do these using the new <header> and <footer> tags available in HTML5
HTML5에서 이용가능한 새로운 <header>과 <footer> 태그를 사용하여 이 일을 할 것입니다.
You can learn more about HTML5 at the w3cschools site: http://w3schools.com/html5/default.asp
w3cschools 사이트에서 HTML5에 대해 자세히 알아볼 수 있습니다 : http://w3schools.com/html5/default.asp
<!DOCTYPE html>
<html lang="en">
<head>
<meta charset="utf-8" />
<title>My Favorite Movies</title>
</head>
<body>
<header>
<h1>A list of my Favorite Movies</h1>
</header>
<div id="movieslist">
<ol>
<li><a href="#">It’s a wonderful life</a></li>
<li><a href="#">Lord of the Rings</a></li>
<li><a href="#">The Fourth World</a></li>
<li><a href="#">The Lion King</a></li>
</ol>
</div>
<footer>
This site was built using Microsoft WebMatrix.
<a href="http://web.ms/webmatrix">Download it now.</a>
</footer>
</html>
As you can see, they are pretty straightforward pieces of HTML.
볼 수 있듯이, 그들은 HTML의 아주 간단한 부분입니다.
For the header, we just wrap the <h1> that we created earlier in a <header> tag.
헤더를 위해, 우리는 우리가 <header> 태그에 앞에서 만든 <h1>을 래핑합니다.
For the footer we just create a little text and a hyperlink.
바닥글을 위해 우리는 조금의 텍스트와 하이퍼 링크를 만듭니다.
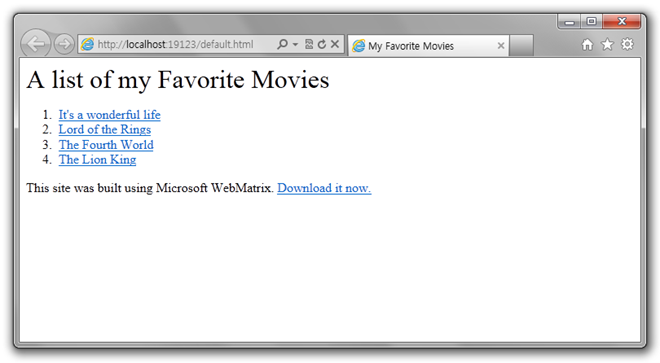
When you look at the page within the browser, it will now look something like this:
당신이 브라우저 내에서 페이지를 볼 때, 지금과 같이 표시됩니다 :
Other than the footer, it’s not much different, but don’t worry, that will soon change!
바닥글 외에, 그것은 그렇게 많이 다르지는 않습니다. 그러니 걱정마세요, 그건 곧 바뀔 것입니다!
페이지의 룩 앤 필(Look and Feel) 정의하기
In the previous section, when looking at the anchor tag, you learned about attributes, where attributes describe how the element behaves.
이전 섹션에서 앵커 태그에서 볼 때, 당신은 attributes에 대해 배웠고, 어디에 attributes가 요소가 작동하는 방법을 설명 특성을 배웠습니다
In the case of the anchor tag, you defined the behavior of what would happen on the click event by specifying the HREF attribute.
앵커 태그의 경우에는, 당신은 클릭 이벤트에 href attribute를 지정함으로써 나타나는 동작을 정의합니다.
As you might expect, you can use attributes to specify how the element looks, including font style, font size, color, border and much more.
당신이 기대한대로, 당신은 글꼴 스타일, 글꼴 크기, 색상, border등을 포함한 많은 것이 요소에서 어떻게 보이는 지 방법을 지정하기 위해서 attribute를 사용할 수 있습니다.
So, for example if you remember the <h1> that we defined on the page, that reads ‘A list of my Favorite Movies’, you could change its font and color like this:
그래서, 예를 들어, 만일 당신이 ‘A list of my favorite Movies’를 읽는 페이지를 정의한 <h1>을 기억한다면, 당신은 글꼴과 색상을 이렇게 바꿀 수 있습니다:
<h1 style="color:blue; font-size:32; font-family:Verdana; text-decoration:underline">A list of my Favorite Movies</h1>
As you can see, the style attribute of the <h1> tag contains a list of definitions for the style.
당신이 볼 수 있듯이, <h1> 태그의 스타일 속성(attribute)은 스타일에 대한 정의의 목록이 포함되어 있습니다
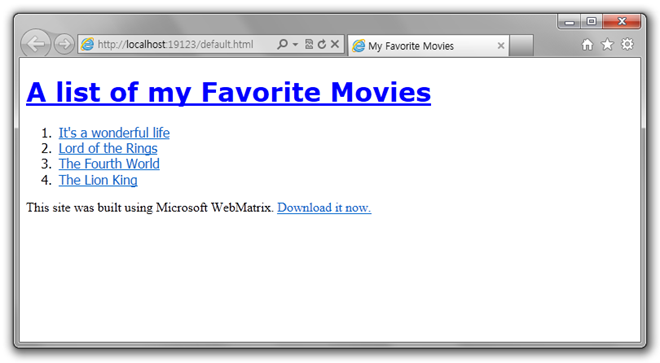
So the above markup set the color to blue, the font size to 32, the font family to Verdana and the text decoration to underline, giving you a result like this:
그래서 위의 마크업은 파란색, 글꼴사이즈 32, 글꼴 Verdana로, 그리고 텍스트 장식으로 밑줄 항목으로 설정했고, 이와 같은 결과를 줍니다.
While this works well, it isn’t the greatest way to style the page.
이것은 잘 작동하지만, 그것은 페이지를 스타일하기에는 가장 좋은 방법이 아닙니다.
Consider what would happen if you had to style every element in that way.
당신이 모든 요소를 그런식으로 스타일을 할경우, 무슨 일이 생길지 생각해보십시오.
You’d end up with a lot of text on your page, slowing down the download and slowing down the browser.
많은 텍스트가 페이지에 있게 되고, 결국 당신은 다운로드와 브라우저를 늦추게 됩니다.
Fortunately, there’s another way, and that is to use a style sheet on your page.
다행히, 당신의 페이지에 스타일 시트를 사용하는, 다른 방법이 있습니다
Style sheets are defined using the concept of Cascading Style Sheets where a style set on an element can be inherited by a child of the element.
스타일 시트는, 설정된 스타일 요소가 자식요소에 의해 상속될 수 있는CSS 스타일 의 개념을 사용하여 정의됩니다
So, for example if you put a style on a <div>, and that <div> has child <ol> and <li> elements, then the style will also apply to them, unless you as a developer override this
따라서, 예를 들면 당신은, <div>에 스타일을 세우면 ,<div>는 <ol>과 <li>요소를 자식으로 갖고, 당신이 개발자로서 이것을 오버 라이드하지 않는 한, 그럼 스타일도 그들에게 적용됩니다.
. A great place to learn more about CSS is w3cschools: http://w3schools.com/css/default.asp.
Css에 대한 더 자세한 내용을 배우기 원하면 w3cschools를 참조하십시오: http://w3schools.com/css/default.asp
Let’s take a look at what it takes to define the style on the <h1> tag, without using a lot of inline code on the style attribute.
이제는 스타일 속성에 인라인 코드를 많이 사용하지 않고, <h1> 태그에 스타일을 정의하기 위해서는 무엇이 필요한지 살펴 봅시다.
So, instead of putting all the styling code into the <h1> tag itself, we’ll just specify it’s class attribute, like this:
그래서, <h1> 태그 자체에 모든 스타일 코드를 넣는 대신에, 우리는 단순히 클래스 속성을 이런 식으로 지정하게 됩니다.
<h1 class="Title">A list of my Favorite Movies</h1>
Now that the tag has a class, we can tell the browser to use a specific style for everything that has this class. 이제 그 태그는 클래스를 가지고 있고, 우리는 이 클래스를 가지고 있는 모든 것을 위한 특정 스타일을 사용하여 브라우저를 구분할 수 있습니다.
This is done with the CSS code syntax like this:
이것은 이와 같은 CSS 코드 문법으로 이루어집니다 :
.Title {
font-size: xx-large;
font-weight: normal;
padding: 0px;
margin: 0px;
}
The style ‘language’ is comprised of a list of attributes separated by semi-colons and contained within braces ({..}).
스타일 ‘언어’는 세미콜론으로 구분된 속성 목록으로 구성되어 있고,중괄호 내에 ({..})를 포함하고 있습니다.
If this is to apply to a class, the class is defines using the ‘dot’ syntax, which boils down to the class name preceeded by a dot.
이것은 클래스에 적용할 경우, 클래스는 점 앞에 있는 클래스 이름을 압축하는 ‘점’구문(‘dot’syntax)을 사용하여 정의됩니다.
This code is placed within a <style> tag in the header of the page.
이 코드는 페이지의 헤더에 <style> 태그 안에 위치합니다.
Your page markup should look like this:
페이지 마크업은 다음과 같이합니다:
<!DOCTYPE html>
<html lang="en">
<head>
<meta charset="utf-8" />
<title>My Favorite Movies</title>
<style type="text/css">
.Title {
font-size: xx-large;
font-weight: normal;
padding: 0px;
margin: 0px;
}
</style>
</head>
<body>
<header>
<h1 class="Title">A list of my Favorite Movies</h1>
</header>
<div id="movieslist">
<ol>
<li><a href="#">It’s a wonderful life</a></li>
<li><a href="#">Lord of the Rings</a></li>
<li><a href="#">The Fourth World</a></li>
<li><a href="#">The Lion King</a></li>
</ol>
</div>
<footer>
This site was built using Microsoft WebMatrix.
<a href="http://web.ms/webmatrix">Download it now.</a>
</footer>
</html>
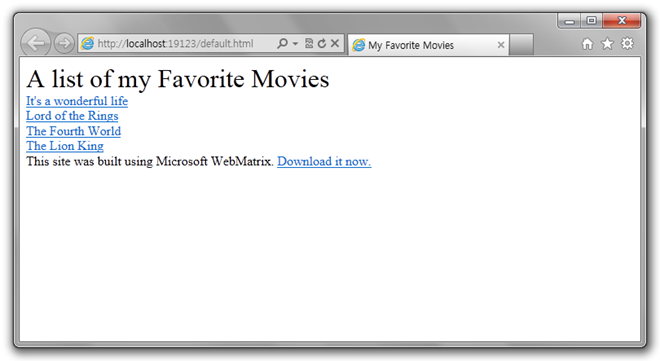
When you run it, the style will take effect, and you’ll see something like this:
당신이 그것을 실행하면 스타일이 적용되며, 그리고 당신은 이와 같은 것을 볼 수 있습니다.
Remember the <h1> had a class of ‘Title’,
타이틀 클래스를 가진 <h1>을 기억하십시오.
so by setting the title, you can set the style for every element that has the same class.
타이틀을 설정함으로써, 당신은 같은 클래스를 가지고 있는 모든 요소에 대한 스타일을 설정할 수 있습니다.
When you want to set a specific element, you can either use a class for that element knowing that there’s only one instance of that class, or you can name the element, using an id, and then set the class for that id.
당신이 특별한 객체를 설정할 수 있는 것은 그 클래스의 단 하나의 객체만 있다는 것을 알거나 ,당신이 그 객체의 이름을 id를 통해서 지정하고 그 id에 대한 클래스를 지정할 수 있는 경우입니다.
If you take a look at your HTML, you’ll notice that the list of movies is held within a <div> which has been given the id ‘moviesList’. ‘
당신의 HTML을 보면, 당신은 영화의 목록은, 아이디 ‘moviesList’을 준 <div>안에서 개최되는 것을 알 수 있습니다.
You can set the style for this by preceeding it with a # in your stylesheet definition, like this:
당신은 당신의 스타일 시트 정의 안에서 #를 선행함으로써, 이와 같이 이에 대한 스타일을 설정할 수 있습니다:
#movieslist{
font-family: Geneva, Tahoma, sans-serif;
}
This is defining a style for the <div>, and because style sheets cascade (giving them the name), any element within this div will also have this style applied to it.
이것은 <div>스타일을 정의하는 것이고, 스타일 시트들이 (그들에게 이름을 주는) 상속을 받았기 때문에, 이 div 내의 모든 요소는 동일한 스타일을 가지게 됩니다.
So, even though I haven’t specifically set the style for the <li> elements containing the text, the style is still applied:
그럼, 구체적으로 텍스트가 포함된 <li> 요소에 대한 스타일을 설정하지 않은 경우에도, 스타일은 여전히 적용됩니다 :
Remember the browser defaults to rendering <li> objects in a <ol> list as numbered items.
브라우저에서 <ol> 목록 안의 <li> 객체를 그릴 때에는 번호가 붙여진 항목으로 그리는 것이 기본값임을 기억하십시오.
We can get rid of that by setting the style
우리는 스타일을 설정하여 그것을 없앨 수 있습니다.
Because these objects are inside the div that we called ‘movieslist’, we can address them easily to change their style.
이러한 개체는 ‘movieslist’ 라고 부르는 div 내에 있기 때문에 우리는 그들의 스타일을 쉽게 변경할 수 있습니다.
Here’s the syntax:
아래에 코드가 있습니다:
#movieslist ol {
list-style: none;
margin: 0;
padding: 0;
border: none;
}
This simply states that for each <ol> within #movieslist, set the style to be not a list (i.e. no bullets), no margin, no border, no padding.
이 코드는 # movieslist 내의 각 <ol>의 스타일을 리스트가 아닌 것(예를 들면 점이 없는 것)으로 수정하고 외부, 내부의 여백을 제거하고 경계선을 없앱니다.
Here’s the result: 여기에 그 결과가 있습니다.
And as you can see, the numbers are now gone.
이 결과에서 숫자가 사라진 것을 볼 수 있습니다.
The text of each of the list items was held within an <a> tag, so we can define the appearance of every <a> tag within every <li> tag within #movieslist with this syntax:
각 리스트 항목의 문자열은 <a> 태그 안에 포함됩니다. 그렇기에 우리는 구문과 #movieslist안에 존재하는 모든 <li>태그의 태그<a>가 보여질 형식을 #movielist안에 다음과 같은 코드를 넣어 정의할 수 있습니다:
#movieslist li a {
font-size: large;
color: #000000;
display: block;
padding: 5px;
}
The settings here pretty much speak for themselves, so let’s see what it looks like when we run the page now.
이 설정은 몹시 많은 것을 말해주기 때문에 이것이 어떻게 보이는지 이 페이지를 지금 실행해 봅시다.
When it comes to an <a> tag, there is another behavior that happens when the use hovers over the link.
<a> 태그에서는 링크에 ‘hover’를 사용할 때, 또 다른 속성이 나타납니다.
You can use this to ‘hot track’ the mouse, and change the style of the element when the mouse is over it.
당신은 ‘핫 트랙’에 마우스를 ‘hover’ 하였을 때 이것을 사용할 수 있으며, 이를 통해 마우스가 위에 있을 때에 요소의 스타일을 변경할 수 있습니다
CSS also supports this, using the following syntax
CSS는 아래의 코드를 통해 이 기능을 지원합니다:
#movieslist li a:hover{}
So, we can now define what to do when the mouse is hovering over a tag:
#movieslist li a:hover {
border-left: 10px solid #94c9d4;
padding-left: 10px;
background-color: #e7f5f8;
text-decoration: none;
}
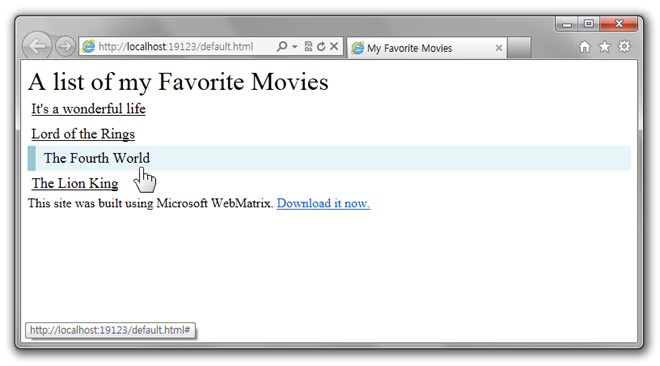
This gives the text a 10 pixel border on the left and a background color to highlight the text. 이것은 텍스트를 강조하기 위해 왼쪽과 배경 색상에 10 픽셀의 테두리를 제공합니다
You can see what this looks like with a when the mouse is over one of the options here: 당신은 이것은 마우스가 여기 옵션 중 하나 이상이 설정되어있을 때 어떻게 나타나는지를 볼 수 있습니다 :
It’s fun to experiment with CSS and WebMatrix makes it easy.
이것은 CSS와 함께하는 즐거운 경험이며 WebMatrix가 이것을 보다 쉽게 해줄 것입니다.
As you’ve been working along you probably thought ‘wait a minute – this CSS stuff is all very nice, but what if my site has more than one page?’
지금까지 진행을 따라 작업을 해왔다면 다음과 같은 의문이 들것입니다. – ‘이 CSS는 매우 멋져, 하지만 내 웹사이트는 하나 이상의 페이지를 가지잖아?’
It’s a great question, because here the CSS has been integrated into the page <head> using a <script> block.
지금까지 <script> 블록을 사용하여 <head>에 CSS를 모아두었었기 때문에 이것은 좋은 질문입니다.
The good news is that the <script> block doesn’t just have to use script from within it – it can be pointed to an external file, and this way, any page that points to that file will be able to take advantage of the same styles.
It’s easy to do this with WebMatrix.
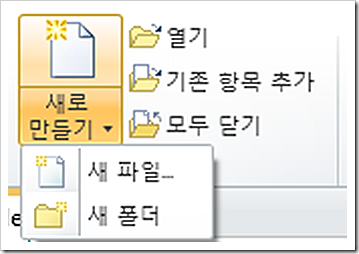
With the ‘Files’ workspace open, click the ‘New’ button and select ‘New File…’
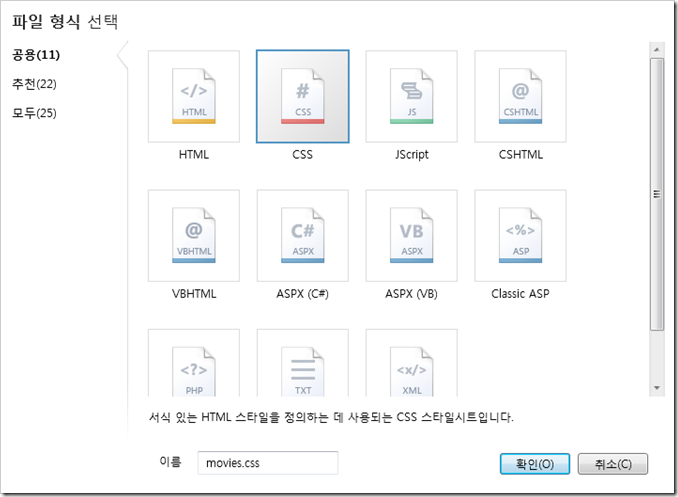
The New Files dialog box will open. Select ‘CSS’ as the file type and give the CSS the name ‘movies.css’.
좋은 소식은 <script> 블록은 단지 그 블록 내부의 스크립트만을 사용하지 않는다는 것입니다 -<script> 블록은 외부 파일을 가리킬 수 있으며 이 방법을 사용하여 각각의 페이지가 하나의 파일을 가리키도록 할 수 있습니다. 이 방법은 여러 개의 페이지가 같은 스타일을 사용하도록 만드는데 큰 이점을 가져다 줍니다.
WebMatrix를 이용하여 이 작업을 쉽게 할 수 있습니다.
작업 화면의 ‘File’ 메뉴에서 ‘New’ 버튼을 누른 후 ‘New File…’을 선택하면
새 파일을 만드는 다이얼로그가 열립니다. ‘CSS’를 파일 형식으로 선택하고 ‘movie.css’라는 파일 이름을 정해줍니다.
Press OK and you’ll get the Movies.css file created for you. It will contain an empty <body> tag, like this:
Replace this with the CSS below. I’ve tidied up some of the CSS that you were using as you worked along, and have created specific CSS for the header instead of using the Class attribute on the <h1>, this makes for cleaner HTML.
Go back to your page, and delete the entire <script> tag, and replace it with this:
This tells the browser to load your style sheet instead of getting the styles directly within the page. Your page markup should now look something like this, which I’m sure you’d agree is much cleaner:
The footer looks a little untidy, so let’s add some styles to the CSS file to make it look a little nicer.
This centers the text, and gives it a small font in grey. You can see the result of that here:
‘OK’ 버튼을 누르면 Movie.css 파일이 새로 생성됩니다. 그 파일은 아래와 같이 빈 <body>태그를 가지고 있습니다:
body {
}
CSS코드를 아래와 같이 수정합니다. 나는 여러분들이 따라 했던 것처럼 몇 가지 CSS를 묶었습니다. 그리고 클래스의 속성으로 <h1>을 사용하는 대신 header를 위한 특별한 CSS를 따로 만들었습니다. 이것은 HTML을 보다 깨끗하게 만듭니다.
body {
font-family: Tahoma, Verdana, Geneva, sans-serif;
width: 85%;
margin: 20px auto;
}
header {
padding: 10px;
border-bottom: 1px solid #e5e5e5;
}
header h1 {
font-size: xx-large;
font-weight: normal;
padding: 0px;
margin: 0px;
}
#movieslist{
margin: 20px 0;
}
#movieslist ul {
list-style: none;
margin: 0;
padding: 0;
}
#movieslist li a {
font-size: large;
color: #000000;
display: block;
padding: 5px;
}
#movieslist li a:hover {
border-left: 10px solid #94c9d4;
padding-left: 10px;
background-color: #e7f5f8;
text-decoration: none;
}
이전의 페이지로 돌아가서 <script> 태그를 전부 삭제한 다음 아래의 문장처럼 수정합니다:
<link rel="stylesheet" type="text/css" href="movies.css" />
이것은 당신의 브라우저에게 그 페이지에 직접 포함되어 있는 스타일을 사용하는 것 대신, 스타일 시트를 불러오도록 합니다. 당신의 페이지는 아래의 그림처럼 보여질 것이고, 이 방법이 좀더 깨끗하게 보인다는 점에 당신도 동의할 것이라고 확신합니다:
<!DOCTYPE html>
<html lang="en">
<head>
<meta charset="utf-8" />
<title>My Favorite Movies</title>
<link rel="stylesheet" type="text/css" href="movies.css" />
</head>
<body>
<header>
<h1>A list of my Favorite Movies</h1>
</header>
<div id="movieslist">
<ol>
<li><a href="#">It’s a wonderful life</a></li>
<li><a href="#">Lord of the Rings</a></li>
<li><a href="#">The Fourth World</a></li>
<li><a href="#">The Lion King</a></li>
</ol>
</div>
<footer>
This site was built using Microsoft WebMatrix.
<a href="http://web.ms/webmatrix">Download it now.</a>
</footer>
</html>
하단은 아직 약간 어수선해 보입니다. 그러므로 몇 가지 스타일을 CSS파일에 추가하여 좀더 멋지게 보이도록 하겠습니다.
footer {
font-size: smaller;
color: #ccc;
text-align: center;
padding: 20px 10px 10px 10px;
border-top: 1px solid #e5e5e5;
}
이 가운데 문장은 글자를 회색 작은 폰트로 만들어 줍니다. 당신은 아래의 그림에서 그 결과를 볼 수 있습니다.
요약
In this article you saw how to use CSS in WebMatrix to add styling information to your page.
이 기사에서 당신은 당신의 페이지에 스타일정보를 입히기 위하여 WebMatrix에서 css를 사용하는 방법을 보았습니다.
You saw how to externalize the CSS so that it can be shared across pages, including how to set up a CSS class that allows you to style multiple elements, how to use CSS to set up the design for a specific element using its ID, and how to cascade design information from container elements down to their children, as well as allowing children to override the style of their parents.
지금까지 서로 다른 페이지에서 외부의 동일한 CSS를 참조하도록 하는 방법과 다양한 항목에 스타일을 제공하는 CSS class를 만드는 방법, ID를 이용하여 특정한 항목에 디자인을 적용하는 방법, 디자인 정보를 담은 항목이 그들의 자식들에게 정보를 내려주고 마찬가지로 자식들이 자신의 부모에게 내려 받은 정보에 새로운 스타일을 덮어 쓰는 방법을 배웠습니다.
이 시리즈의 4번째 장에서는 당신은 모든 페이지에 걸쳐 일반적인 콘텐츠를 제어하는 레이아웃을 사용하는 방법을 배우게 됩니다.



















코드 입력하고 실행하면 http://localhost:13361/ 밖에 안뜨고 default.html 은 제가 따로 입력해서 붙여써줘야 뜨더라구요..왜그런거죠?
저 자꾸 파일을 새로만들어야 되더라구요.. 한번 한걸로 수정하고 또하면 자꾸 수정전 원본 파일만 뜨고 아예 파일을 새로 불러서 해야 되더라구요 왜그런거죠;ㅠ